Showing posts with label Free Downloads. Show all posts

Tuesday, November 3, 2015

Editable Home School Checklist

Both Josiah and I like using a checklist to keep track of his tasks and assignments throughout our homeschooling day.  I found it helps keeps us more organized, focused and minimizes "nagging" (me) & "attitude" (Josiah).  :)

I created the checklists in PowerPoint with editable text boxes so you can format them to fit your family's and/or each child's individual needs. All the checklists are essentially the same except for the cute clip art in the corner.  


I'd love to hear if you found them helpful or have suggestions to make them better.  Enjoy! 

Thursday, June 14, 2012

Plans For a SeNsAtiOnAL SUMMER

I'm BAAAAACCCCCCKKKKK!!

Since the beginning of April I have been suffering with extremely low iron counts.  This is very unlike me, but I can sum up the past 3 months in one sentence-- lots of bed rest, an ER visit, probably 20 doctor & lab visits, blood transfusion, five iron infusions (& counting), and a partial hysterectomy. 

So that's what I have been doing in your absence!  But, I'm happy to report I am feeling much better and healthier, which means we are finally ready to kick off summer at our house!  I definitely owe Josiah some fun given all the boredom he has endured at the doctors, hospital, and home!

Just like last year, I have planned lots of special activities for us to enjoy so we squeeze every bit of fun out of summer!  We call these activities our Summer Bucket List!  I incorporated lots of new ideas with the ol' standard activities that make summer, well, SUMMER!

Here's a glimpse of our Summer Bucket supplies :)


Here's a link to see our list of summer bucket activities


I changed how we are picking & choosing activities.  Last year, we randomly drew an activity out of a bucket.  However, Josiah didn't appreciate the "randomness".  There were very specific activities that he wanted to complete ASAP.  Because I stuck to the rules, he became frustrated and eventually uninterested in the bucket list.

Therefore, in an attempt to complete each and every task before summer "kicks the bucket" AND keep Josiah engaged ALL summer long, I have adjusted our picking-n-choosing format! 

I color coded each activity, cut them out on heavy cardstock, laminated them and put them on the frig.  So, now Josiah can choose any activity he wants and once we complete it, we move it to the "TA DONE" section on our frig :) 


Refrig-- To Done & Ta Done!

There is only one summer bucket rule:  He cannot pick a same color activity 2x in a row!  He has to pick a different colored activity each time, to help keep things a little varied :) 

Of course, there can't only be fun....We've been assigning Josiah specific chores/tasks that he must complete each day, as well. 

This is our first time formally assigning chores and paying Josiah an allowance for completing them.  He is being paid $.25 per each task completed and paid his accumulated weekly allowance on Thursdays. He won't be paid for some of the chores like brushing his teeth, however, if he doesn't do these tasks, $.25 is subtracted from his weekly allowance.

I created task cards vs. daily task lists, so I have been able to "manipulate" what I need help with, needs done, etc... Plus, each morning he will be "surprised" by his assigned chores!  Here is a link to Josiah's chore cards


These are our plans for a successful, sensational SUMMER!  We'd love to know yours!!

Saturday, April 14, 2012

Helpful Kitchen Hints (including 3 surprises)

I'm always happy to learn about a shortcut or tip that stretches our family's dollars further or simply makes life less complicated.  For example:  laying out your clothes the night before, rotating toys, having a menu plan, etc...so today I'm sharing kitchen, food, & eating tips that just might make your life simpler.

I created a printable shopping list (organized by category) that we keep on the fridge at all times.  As we run out of items we immediately add that product to our list so we can always depend on a well stocked pantry.  Feel free to share and make copies of it for your own personal use! 


Gracie & Josiah

Kid Kitchen Tips
  • Cut food into kid sized bites using a pizza cutter .  These are just a few things we cut with a pizza cutter:  spaghetti, pancakes, hot dogs, chicken nuggets/strips, quesadillas, bologna, and cheese slices.  We learned this trick from my brother Rick :) 

  • School Lunch idea-- Josiah doesn't care much for cold sandwiches when he takes his own lunch.  Therefore, I sometimes send milk, cereal and fruit for lunch.  I send his soy milk in a spill-free bottle and put cereal in a Tupperware bowl.  But, for those with kids not requiring soy milk,  your kids could just use their lunch milk to pour into their dry cereal. 
Saving time & money makes every one happier!

    Money & Time Saving Tips
    • Buy fresh herbs in a squeeze tube.  My favorite brand is Gourmet Garden.  You'll find these in the produce's refrigerated section at a major grocery store.  Time to time you need fresh herbs (like basil, ginger, Italian seasonings, etc...), however you only use a couple of stems and the rest ends up spoiling.  Not anymore....just buy a $5 tube of herbs and it will last for several months!  Plus, you don't have to spend precious time washing and finely chopping the fresh herbs either.   

    • Whipped Cream in a Can.  I love a yummy, frothy Starbucks latte but they are spendy!  So from time to time I splurge on a can to add the creamy yumminess to my morning coffees or hot chocolate to treat my craving more economically.  It's also fun to add a dollop of whip cream to your pancakes, waffles or ice cream sundaes. 

      Food Saving Tips/Stretches with 2 New Recipes

      • Use leftover grilled chicken or steak to make quesadillas.  
      • I use leftover rice to make family fried rice.  (Find recipe here).
      • Leftover mashed potatoes makes the following hamburger pie recipe super quick to whip up. 

      Tuesday, February 28, 2012

      Leap Year Family Time Capsule

      Tomorrow is Leap Day 2012!!! It's definitely a day worth celebrating since it only rolls around every four years!  So, besides leaping into a snow bank (since a big ol' blizzard is currently parked over SD) I've been racking my brain on how to celebrate this special occasion as a family. 

      I've decided we are going to create a Leap Year Family Time Capsule!   I wrote up 29 questions and predictions that we are each (Rob, Josiah and I) going to answer or memorabilia we will need to gather.  Then, we'll compile all of our questionnaires and memorabilia together to create a Family Leap Year Time Capsule that we won't open until Leap Day 2016!  (Certainly the hardest part will be remembering where we put it in order to re-open it...ha ha :)


      I've created a colored version and printer friendly version of the questions and predictions we will be making and answering.  Feel free to use these or adapt them to your family's needs...click here for the printer friendly version. 

      At the end of the questionnaire I listed three things you'll need to do or gather to make your Family Leap Year Time Capsule complete--
      1)  Take a picture of yourself and/or family on Leap Day 2012.
      2)  Each member of the family should put some money, or a small toy, or a book, etc... in your family's time capsule that you think you might enjoy by Leap Day 2016. 
      3)  Take a video of your neighborhood, house and/or surroundings.  Burn the video to a CD and included it in your Family Leap Year Time Capsule. 


      We also will be celebrating Leap Day 2012 by: 
      • Going for a walk (either around our block four times or around the mall 2 times) in less than 29 minutes!
      • Capture photos of yourselves leaping (maybe include these in your Family Leap Year Time Capsule). 
      • Seeing how many different objects we can leap off of throughout the day (hopefully at least 29 of them!!)
      • Playing a game of Leap Frog. 
      • Going on a scavenger hunt to find four little surprises!  (Adaption suggestions:  Print out 29 little clip art frogs.  Or if you have a large family hide one frog and give each person four opportunities to find it). 
      Whatever you do-- be intentional and have fun making memories on this special day that only comes around every four years! 

      Happy Leap Year/Day 2012!

      p.s. I would love to hear any other ideas or suggestions other families do! 

      p.s.s. Happy Birthday Carson!!! (Yep, we really know a little boy who was born 8 years ago on Leap Day 2004!)  Speaking of such, that would be a great dinner time conversation starter to ask your kids how they would feel celebrating their true birthday once every four years? :)

      Tip Junkie handmade projects

      Tuesday, December 6, 2011

      Muffin Tin Advent Calendar & Ideas

      I'm so sorry I never made even one blog entry the entire month of November...shame on me!!   Well, I love to share, so I'm back at it!  Thanks for sticking with me!  I promise not to let you down...this entry will make up for my long absence!!!

      Last year, I started a new advent tradition with Josiah.  I confess I stole the idea from other bloggers.  And he/we liked it so much, I passed the tradition onto 4 other families last year and another 7 this year. Counting our family, I created materials for 12 family advent calendar this year! 

      Muffin Tin Advent Calendar


      To make the advent calendar use a mini muffin tin (with 24 holes).  Then, using solid scrapbook paper, cut 2 1/4 X 2 1/4 squares and cut 2 X 2 squares out of coordinating scrapbook paper.  (Note: I like to corner round all the edges.)  Stick the squares together with adhesive tape and stick magnets on the back corners.  (I cut my magnets from a roll of magnetic strip). 
      Embellish the squares with numbers and decorations!  (FYI- I bought most of mine at Hobby Lobby).  The smaller the embellishments the better because a 2 X 2 space isn't very big. 

      Here is a closer look at my squares (you can click on each photo within the collage for an even closer look): 


      Here is the link to access my number template, if you don't want to create your own.  Just print them on solid cardstock and punch them out with shaped punchers (circles, starts, hearts, etc...). 

      Now the fun begins... you need to think up 24 activities!  Type up your ideas, cut them into strips and tuck them behind your cardstock squares. 

      **SPOILER ALERT--To the families I gave muffin tins and activities to, don't look at 2011 ideas if you still want to be surprised each day**

      Here are the links to access my advent calendar ideas:
      Or get creative and make up your own!!!! I am already starting next year's list :)  Of course, you can find more inspiring advent activities on Pinterst, too!

      Bag of Activities

      If you peeked at my lists, you noticed that most days the kids have a "present" to open.  The "present" usually contains the materials for the activity, craft, etc... Or it is a small candy or gift :) I wrap all of the "presents" and label them with the coordinating day of the activity, so they know what present to open on which day.  I provide a big sack to stick the presents in. 

      It is a lot of work to gather all the materials ahead of time, but I completely recommend it!  This makes the whole process hassle/stress free for you, which is especially important during December!  It also builds the anticipation for the kids, because each day they get to sort through the bag of packages to find the right one! 

      I prop up our advent calendar with a large easel.  It not only makes your advent calendar more functional but turns it into a great decoration as well :)  I found it's also important to have a little bucket or basket near your calendar to put the number squares in as the kids take them off-- or the little squares will quickly become ruined and UNusable for another year. 

      This is what our advent calendar looks like this morning
      after 6 days of activities.

      Here is a picture of Josiah with his addressed Santa letter-- that was the advent calendar activity this past Sunday :) Thank goodness, Santa won't have any problem making his wish list come true this year!!! Since it has been an issue in the past....phew!

      Dear Santa....

      In case you'd still like to make an advent calendar to use yet this month, then just make one out of a regular size muffin tin with 12 holes and count down the last 12 days until Christmas! 

      Also, let me know if you have any questions or need more clarification! I will provide you with all the links, directions, etc... for each activity by request. 

      I would love to know the intentional ways your family celebrates advent/Christmas or if you plan to make a muffin tin advent calendar for you & yours! Or just comment on what you'd like to see next on my blog...Christmas cookie recipes, main dish recipes, more crafts, stories, etc...

      p.s. An advent calendar makes a wonderful family Christmas gift!!

      Monday, October 31, 2011

      Fall Crafting and Decorating


      I can't believe tomorrow is November 1st-- that marks the date we start listening to Christmas music in our home :) So, I better get my fall craft project ideas posted before time runs out for folks to make them and enjoy them through Thanksgiving.

      2 X 4 Blocks
      Using 2 X4 scraps, acrylic paint, scrapbook paper and mod podge I made these blocks to spell out Fall.

      A "graduated" 2 X4 block pumpkin.

      I used some more 2 X4 scraps, paint, and a wood dowel to make some pumpkins.


      Paper Pumpkins

      Rounded Paper Pumpkins
      Archiver's Accoridan Paper Pumpkin Project

      Rounded Paper Pumpkins

      Supplies:
      • Double sided 12 X12 scrapbook paper
      • 2 brads per pumpkin
      • paper cutter 
      • paper puncher
      • ribbon or paper for stem
      Instructions:
      1.  Cut 12 one inch strips of 12 X12 paper with paper cutter to make a large pumpkin. 
      2.  Punch a circle at the bottom and top of each strip of paper.
      3.  Cut a piece of ribbon or paper to make a round stem.  
      4.  Bind strips together by using a brad. Also adhere stem to pumpkin using a top brad.   
      5.  Slide strips apart one by one to make a pumpkin shape. 

      Archiver's Accordian Paper Pumpkin Project/Tutorial

      When I recently visited an Archiver's store, I picked up an instruction sheet on how to make this pumpkin decoration.  It is adorable but it was a struggle to make with their directions.  So, I decided supplement their directions with a tutorial video.  This should make it much easier for you to create one if you'd like. 

      Supplies: 
      • Martha Stewart scoring board and scoring utensil
      • paper cutter
      • hot glue and hot glue gun
      • 1- 1 1/2" paper punch (you will need 20 circles)
      • scissors
      • leaves
      • twine/ribbon
      • eight 12 X 12 sheets of solid or coordinating double-sided scrapbook paper
      • 1 sheet for the stem
      Instructions: 
      View my uploaded Archiver's instruction sheet here and my tutorial movie below. 


      Burlap Wreaths
      Hallowee "Boo" wreath

      I made the "Boo" wreath by spray painting 1 yard of burlap fabric black and cutting it into strips. I used pipe insulation to make a wreath and spray painted it black too.   Double tied the strips of burlap randomly around the wreath.  Modpodged scrapbook paper onto the chipboard letters and loosely tied them to the wreath with twine.  I hot glued the ends of the orange ribbon together to create a hanger. 
      Fall Bubble Burlap Wreath
       I was inspired to make this burlap bubble wreath by this tutorial at Today's Fabulous Finds blog.  I again used pipe insulation to create the wreath but I wouldn't suggest it for this type of wreath.  Some of my stick pins aren't sticking into the foam very well, so I would spend the money on an actual foam wreath, if I were to make this again. 

      And of course, a Grateful Banner
      Grateful Banner

      Here's the link to my banner/pennant tutorial to make your own.   

      So from our home to yours-- Happy Fall ya'll :)  Now, enough crafting....I need to get back to cookbook typing, formatting and publishing! 

      Friday, August 19, 2011

      A Collection of Back 2 School Ideas


      Our summer was filled with lots of special moments and celebrations, but "summer fun" is over.  Josiah goes back to school on Monday. 

      "Back to school" isn't quite what we envisioned this Fall because Josiah will be attending a public elementary school rather than Christian Center Elementary. We are very sad that circumstances in our lives are preventing us from sending him back to CCE, but we are so thankful for the time God allowed us to be there. 

      Josiah will be a 1st grader this year in a classroom of 25 kids and will be riding a school bus back and forth from school everyday.  A few days ago, we were able to visit his classroom and meet his teacher.  I was very pleased and I'm excited for him! 

      Rather than taking your school supplies the 1st day of school, now most schools request that you take them to "Meet the Teacher Night".  So, to help Josiah make packing his supplies a little more exciting, we sent him on a scavenger hunt for his labeled supplies.  (I got the idea from Happy Home Fairy and used most of their clues but also had to create a few of my own, as well.  You can find my extra clues here.)


      Feeling proud we had his school supplies and made packing them fun, the three of us headed off to school.  However, as different students and parents came in carrying their school supplies and talking about them, I realized Josiah didn't quite have the right supplies.  I even questioned the teacher about some of the supplies I couldn't find on our list.  Guess what??? After we returned home, I realized I bought the wrong list of supplies.  I bought the Kindergarten Supply List and not the 1st Grade one.  Argh!!!

      Silly me!  I guess I'm in denial that he is growing up right under my nose (he is actually almost to my nose) and we have a 1st grader :)  So, today Josiah and I are headed back out to the stores to buy the supplies we were missing.  I'm just thankful I realized my mistake before the 1st day of school when he started unpacking his supplies. 

      In preparation for "Back to School" I have been collecting ideas to make it more fun and meaningful.  Here is a list of printable resources I am excited to use.  Just click on highlighted words and you will be directed to the original source where I found the idea(s). 
      Last year I was overwhelmed with all the cute papers and projects that Josiah brought home.  :)  Even though I'm sentimental and love to keep all the memories, I DISLIKE paper clutter and the "frig" only has so much space!  So, I created a little clothesline on our kitchen wall to display his papers and projects.  It worked really well!  If you have primary aged kids at home, you might want to consider using this idea too.  All you need are three inexpensive supplies to create your own:  3M Command hooks or cup hooks, hemp twine/string, and clothespins. 


      Wednesday, August 10, 2011

      Newton Hills Nature Scavenger Hunt

      
      Kendall and Disney
      Yesterday we loaded the van for a short trip to Newton Hills State Park, which is about 30 minutes south of Sioux Falls to go on a hike and nature scavenger hunt.  Barby's kids- Kendall and Logan, AND their dog, Disney, their summer babysitter, Michelle, and Josiah's play date buddy, Owen, joined us. The weather was PERFECT--75 degrees, clear sunny skies and no wind...absolutely perfect conditions for a hike and picnic!


      This activity was one of our Summer Bucket List activities.  I was inspired by Sun Scholars to make the hike a more meaningful, intriguing and fun by making it a NATURE SCAVENGER HUNT!  I cut out their pre-made cards and used tape runner to tape them back to back (to conserve laminating and make them less bulky), laminated them, single hole punched and attached them together with an O ring hook.  Now, we can use them again and again--while camping, in the back yard, on a field trip, at a park, etc... :)


      Upon our arrival, I gave each child a set of cards and a brown paper sack and explained they could only pick up things that were on the ground and would fit into their bag.  That's it....it was that simple!  I decided not to complicate the fun by giving prizes, etc...and the kids never asked.  :)

      Logan, Owen, and Josiah
      Since I was headed to FedEx/Kinko's to laminate, I also took the opportunity to laminate several different versions of Road Trip Bingo cards I found at Mom's Minivan, Oppsey Daisy, and Homemaking Expert.  Again, I taped the games together (front and back) to conserve laminating.  Part of the van played these games on the way back from Newton Hills, but I am going to permanently keep them with some dry erase markers in a van seat pocket to use whenever road trip boredom strikes! 


      Tuesday, August 2, 2011

      Angry Bird Party Plan & Resource List

      Finally, I am following through on my promise on sharing the details of Josiah's Angry Bird Birthday Party. Since there are not any commercial Angry Bird party supplies available (yet) I had to pull out all my creative juices to create a fun seventh birthday party for Josiah. I found lots of resources on the internet and compiled all of them and my ideas below.

      Invites

      ·        I made his birthday invitations by using clip art I found online at a variety of different sites. 
       
       
      Balloon Templates & Party Sign


      ·        To create a party atmosphere I ordered two helium balloon bouquets of red, white, black, yellow, red and blue balloons to create our own Angry Birds.  Unfortunately, no one ever took a picture of them.

      ·         You can find the balloon templates I used here. 

      ·        I printed the templates on white cardstock paper and attached them to the balloons with foam dimensional stickers. 

      ·        I wanted to use green paper plates and balloon templates to make lots of “pigs” to staple to our wooden fence that the kids could have fun shooting/aiming at.  However, that never got done because we ran out of time. 

      ·        I also came across several examples in which people hung balloons from their ceilings when they planned an indoor party. 


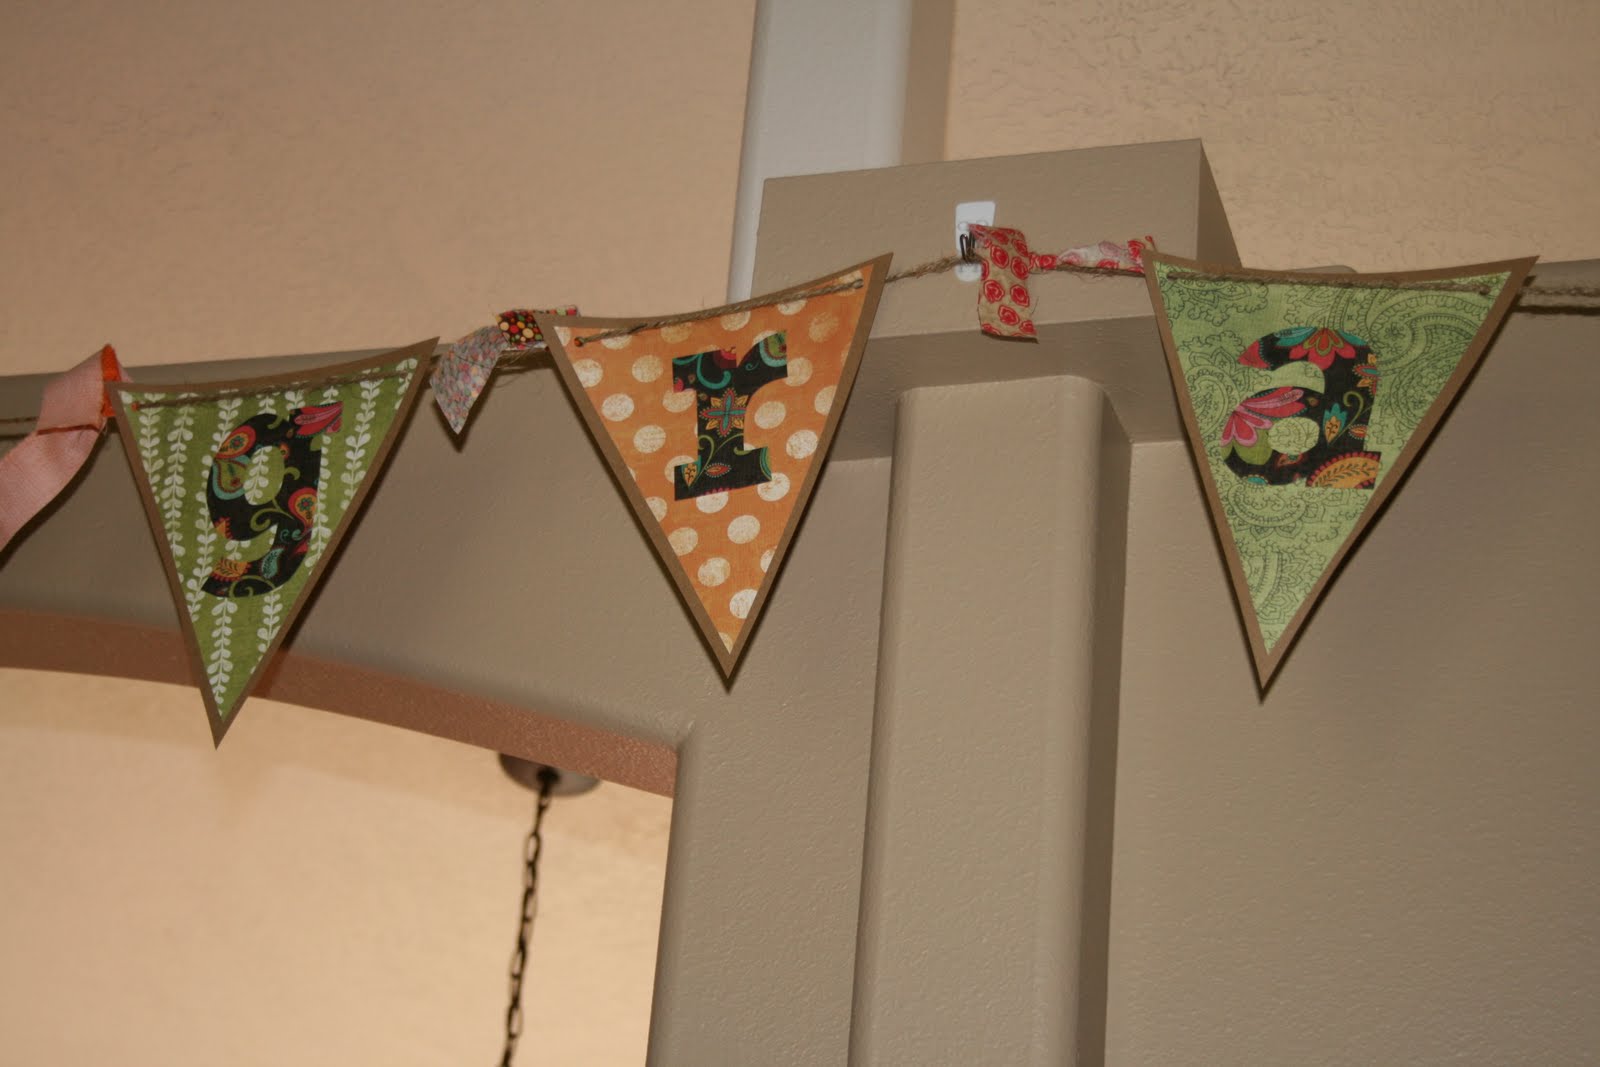
      ·        I recruited the boys' help to create a pennant/banner that said “Help Us Save Our Eggs” which we stapled on our backyard wooden fence. 
      Party Food

      ·        We served supper to our guests—make your own sub sandwiches, a couple of salads, fruit, and chips. 

      Party Hats


      ·       We started the party by making our own hats.  I was pleasantly surprised of how the kids got into the spirit.   I told them they had to gear up to take on the pigs! 

      ·       We printed and cut out red, blue, and yellow angry bird characters on white cardstock from coloring pages on Cartoon Jr. to have the kids decorate and make their own party hats.  I provided colors, markers, feathers, and wiggle eyes to make them.  We then glued their characters to strips of construction paper to make “head band” party hats.

      ·       Have stapler(s), scotch tape, and/or glue readily accessible for putting together the head bands.  

      ·        You can find the coloring pages we used here. 

      ·        Since we always have family birthday parties, the mommies and kids made the party hats while the dads and older kids hid eggs for our Golden Egg Hunt. 


      Golden Egg Hunt

      ·       Since the main objective of the Angry Birds video game is protecting the eggs, we used leftover plastic Easter eggs to have an egg hunt.  I had about 125 of them. 

      ·       I created slips of paper with points on them and placed them in the eggs.  The dads and older kids hid them in the backyard while we made party hats inside. 

      ·       I provided each child with a brown paper sack and said they could only find eggs until their sack was full. 

      ·       I awarded prizes (card games) for the highest AND lowest points found.  The golden egg contained 10,000 points. 
      Egg and Spoon Race

      ·      


        ·    We separated the kids into teams to have an egg and spoon race, using raw eggs.  The only person who dropped an egg was me when I was explaining how to play the game.  J

      ·        I awarded all the kids tootsie roll lollipops for playing the game. 

      Get the Pigs!


      ·       We gave the kids 1 ½ minutes to get as many pigs as they possible using slingshots and plastic/rubber balls. 

      ·        I made our “pigs” by using about 60 plastic green cups and adhering images of angry bird pigs onto them with a hot glue gun.  Hint:  Buy plastic heavy duty cups (NOT the $1 ones at the Dollar Store) because they will be much sturdier and easier to set up over and over again. 

      ·        We bought the slingshots (water bombs included) for $1 each at the Dollar store.   These also doubled as a party favor. 

      ·        For ammunition I gathered up lots of rubber balls, as well as plastic golf balls and put them in buckets.   

      ·        We stacked the “pigs” on two banquet tables and had two lines going at once.  After 1 ½ minutes, we counted how many cups were knocked down.  We had a final show down between the highest winners to declare one winner and they won a prize. 

      Piñata


      ·        Next we broke our homemade piñata.  Click here for instructions on how to make your own. 

      Cupcakes

      ·        I gathered Angry Bird images online to decorate our red and yellow frosted cupcakes with special Angry Bird cupcake toppers. 

      ·        I intended to have the boys make a display out of the cupcakes by using Mega Bloks and Legos but we ran out of preparation time to do that. 


      Party Favors

      ·        Our party guests took home their party hats, slingshots, water bombs, and pop rocks. 

      Backyard Movie

      ·        We planned to show a backyard movie but the night got late on us and we skipped that.  However, the perfect movie to show would be Rio—just released today! 

      T-shirts

      ·        We bought matching, themed t-shirts at JcPenney!  The kids really got a kick out of the fact that the parents were the pigs!  J 


      Linking up to: 
      Tip Junkie handmade projects

      Thursday, June 9, 2011

      Start Each Day Likes Its Your Birthday

      It's birthday week at our house!!! On June 7th, I celebrated my 37th birthday :)  And Josiah's 7th birthday is on Saturday.  I love birthdays!  So when I saw this printable posted on one of my favorite blogs I had to link it up to mine.  What a great reminder of celebrating each and every day to the fullest! 
      To print out your own copy, all you have to do is pick your favorite color, right click on that image, and save it to your computer!  I suggest printing it out on glossy cardstock and framing it.  I like to display seasonal printables on my kitchen window ledge--that's where my yellow copy is going to go for awhile :)  Thanks Kristyn at Lil' Luna for this lovely reminder and printable;  Happy Birthday to you too!!

      Stay tuned because next week I will be posting all the details on Josiah's upcoming Angry Birds birthday!  I have so many fun ideas to share! 

      Thursday, May 26, 2011

      Seasonal Banner and Pennant Tutorial (*Free Download*)

      With the intention of adding some extra pizzaz to our house when celebrating new seasons, holidays and special events and celebrations I have started creating banners/pennants. It's an inexpensive way to add some seasonal decorations to our house and "shout out" our family's sesonal greetings to the world (at least those who pass by our house from time to time :).

      I started this tradition at Christmas with a "Joy To The World" banner! For Valentine's Day, I made one stating: "Love One Another". And after our long winter, I created a new pennant design "Spring Time". I also created a "Congrats" banner when I hosted my friend's bridal shower.  Since all three of our birthdays fall within the next 1 1/2 months of each other, my next pennant will simply state "Happy Birthday!"  But I'm also tempted to make a "Walking On Sunshine" banner to celebrate summer!  However, Rob reminds me I need to save some ideas for upcoming years :) 


      If you want to start spreading your own messages of fun, hope and love to your family and friends, you are welcome to use my templates. Here are some further instructions, tips, and a supply list to help get you started.  Once you have all your supplies gathered, it will take about 1 hour to create a new pennant from start to "hanging". 

      Supply List:
      • Heavy 12x12 Cardstock
      • Patterned 12x12 Scrapbook Paper that coordinates with heavy cardstock
      • Chipboard Letters, Die Cut Letters, Large Alphabet Sticker Letters, or make letters using a Cricut or Silhoutte Cutting Machine(s)
      • Tape Runner
      • Twine/String/Ribbon (whatever medium you choose to use to hang it with)
      • Single Hole Punch
      • Scissors
      • Decorative Ribbon (optional)
      • 3M Command Adhesive Clips or Hooks
      Tips: 
      • Use double-sided heavy cardstock if your banner/pennant will be seen from both sides.  Since I hang my banners/pennants between my columns I use clean double sided cardstock so it looks nice from both the front and back.  Plus, the heavy cardstock will prevent curling. 
      • If you use my templates you can cut two pieces from one 12X12 piece of cardstock. 
      • Punch a hole in each corner vs. one hole in the middle of each piece.  Each individual piece will hang much nicer and also prevent the cardstock from curling. 
      Click here to view and/or download my banner/pennant templates. 

      If you save or download my templates to create your own banner/pennants please leave me a comment :)  I would love to hear what message you plan to spread AND see pictures! 

      I am linking my post to Paisley Passions.  Click on this link to check out more homemade ideas, recipes, printables, etc...