Showing posts with label Paper Crafts. Show all posts

Monday, February 6, 2012

Honor, Karate and Paper Lanterns @ Kid's Church

As a mother, I feel one of my most important responsibilities (if not, THE most important one) is to train my child in the ways of the Lord.  I do this in many, many different ways throughout the day, weeks and our lives! 

Grandma Laurel praying with Josiah


Therefore, going to church on Sunday mornings is really important to our family!  We attend, The Ransom Church, in Sioux Falls, SD.  We (Rob, Josiah and I) all love our church deeply-- because of it's focus, values, people, pastors, etc...AND our church's kids curriculum! 

Ransom Kids Room/Wall


In December, our church transitioned to a new kid's curriculum, called 252 Basics!  Josiah loves it because of the live drama, fun dance songs, and fun games!  Rob and I love it because he learns important values and Bible stories, learns how to read and look up verses in his Bible, memorizes scripture, and learns how to treat others the way Jesus would want us to treat them!  Every week he comes home with devotions and meal time questions that further reinforce the values, scriptures and Bible stories he is learning. 

In fact, I love and enjoy the curriculum so much--- I help teach and plan all the activities, games, props, and skits that we present to the kids each week!  Rob also helps (running the sound, power point, and filling in any other gaps). 


Each month we focus on teaching the kids about a virtue!  This month our virtue is--HONOR.  We are focusing on teaching honor through Bible stories in 1 & 2 Samuel about the life of David.  And within our messages, skits, and games we have a karate theme woven in them. 

Each month we decorate our classroom/meeting space according to the theme!  So, given the karate theme and mental stimulation games Rob and I made the following the decorations: 

Paper Lanterns


Hanging paper lanterns
Honor Code:  Love each other deeply.  Honor others more than yourselves.  Romans 12:10
February's Memory Verse

Large view of our room
If you live near Sioux Falls and haven't yet found a church home--- we'd love for you to visit our church, The Ransom Church!  Service times are at 9 and 11 am with a Happy Hour between services!!! However, Kid's Church is only offered during the 11 am service at this time.  :)  We'd love to see you and worship with you! 

p.s. The paper lanterns are really easy and cheap to make! I'll post a quick tutorial about how to make them later this week! 
 

Tuesday, December 6, 2011

Muffin Tin Advent Calendar & Ideas

I'm so sorry I never made even one blog entry the entire month of November...shame on me!!   Well, I love to share, so I'm back at it!  Thanks for sticking with me!  I promise not to let you down...this entry will make up for my long absence!!!

Last year, I started a new advent tradition with Josiah.  I confess I stole the idea from other bloggers.  And he/we liked it so much, I passed the tradition onto 4 other families last year and another 7 this year. Counting our family, I created materials for 12 family advent calendar this year! 

Muffin Tin Advent Calendar


To make the advent calendar use a mini muffin tin (with 24 holes).  Then, using solid scrapbook paper, cut 2 1/4 X 2 1/4 squares and cut 2 X 2 squares out of coordinating scrapbook paper.  (Note: I like to corner round all the edges.)  Stick the squares together with adhesive tape and stick magnets on the back corners.  (I cut my magnets from a roll of magnetic strip). 
Embellish the squares with numbers and decorations!  (FYI- I bought most of mine at Hobby Lobby).  The smaller the embellishments the better because a 2 X 2 space isn't very big. 

Here is a closer look at my squares (you can click on each photo within the collage for an even closer look): 


Here is the link to access my number template, if you don't want to create your own.  Just print them on solid cardstock and punch them out with shaped punchers (circles, starts, hearts, etc...). 

Now the fun begins... you need to think up 24 activities!  Type up your ideas, cut them into strips and tuck them behind your cardstock squares. 

**SPOILER ALERT--To the families I gave muffin tins and activities to, don't look at 2011 ideas if you still want to be surprised each day**

Here are the links to access my advent calendar ideas:
Or get creative and make up your own!!!! I am already starting next year's list :)  Of course, you can find more inspiring advent activities on Pinterst, too!

Bag of Activities

If you peeked at my lists, you noticed that most days the kids have a "present" to open.  The "present" usually contains the materials for the activity, craft, etc... Or it is a small candy or gift :) I wrap all of the "presents" and label them with the coordinating day of the activity, so they know what present to open on which day.  I provide a big sack to stick the presents in. 

It is a lot of work to gather all the materials ahead of time, but I completely recommend it!  This makes the whole process hassle/stress free for you, which is especially important during December!  It also builds the anticipation for the kids, because each day they get to sort through the bag of packages to find the right one! 

I prop up our advent calendar with a large easel.  It not only makes your advent calendar more functional but turns it into a great decoration as well :)  I found it's also important to have a little bucket or basket near your calendar to put the number squares in as the kids take them off-- or the little squares will quickly become ruined and UNusable for another year. 

This is what our advent calendar looks like this morning
after 6 days of activities.

Here is a picture of Josiah with his addressed Santa letter-- that was the advent calendar activity this past Sunday :) Thank goodness, Santa won't have any problem making his wish list come true this year!!! Since it has been an issue in the past....phew!

Dear Santa....

In case you'd still like to make an advent calendar to use yet this month, then just make one out of a regular size muffin tin with 12 holes and count down the last 12 days until Christmas! 

Also, let me know if you have any questions or need more clarification! I will provide you with all the links, directions, etc... for each activity by request. 

I would love to know the intentional ways your family celebrates advent/Christmas or if you plan to make a muffin tin advent calendar for you & yours! Or just comment on what you'd like to see next on my blog...Christmas cookie recipes, main dish recipes, more crafts, stories, etc...

p.s. An advent calendar makes a wonderful family Christmas gift!!

Monday, October 31, 2011

Fall Crafting and Decorating


I can't believe tomorrow is November 1st-- that marks the date we start listening to Christmas music in our home :) So, I better get my fall craft project ideas posted before time runs out for folks to make them and enjoy them through Thanksgiving.

2 X 4 Blocks
Using 2 X4 scraps, acrylic paint, scrapbook paper and mod podge I made these blocks to spell out Fall.

A "graduated" 2 X4 block pumpkin.

I used some more 2 X4 scraps, paint, and a wood dowel to make some pumpkins.


Paper Pumpkins

Rounded Paper Pumpkins
Archiver's Accoridan Paper Pumpkin Project

Rounded Paper Pumpkins

Supplies:
  • Double sided 12 X12 scrapbook paper
  • 2 brads per pumpkin
  • paper cutter 
  • paper puncher
  • ribbon or paper for stem
Instructions:
1.  Cut 12 one inch strips of 12 X12 paper with paper cutter to make a large pumpkin. 
2.  Punch a circle at the bottom and top of each strip of paper.
3.  Cut a piece of ribbon or paper to make a round stem.  
4.  Bind strips together by using a brad. Also adhere stem to pumpkin using a top brad.   
5.  Slide strips apart one by one to make a pumpkin shape. 

Archiver's Accordian Paper Pumpkin Project/Tutorial

When I recently visited an Archiver's store, I picked up an instruction sheet on how to make this pumpkin decoration.  It is adorable but it was a struggle to make with their directions.  So, I decided supplement their directions with a tutorial video.  This should make it much easier for you to create one if you'd like. 

Supplies: 
  • Martha Stewart scoring board and scoring utensil
  • paper cutter
  • hot glue and hot glue gun
  • 1- 1 1/2" paper punch (you will need 20 circles)
  • scissors
  • leaves
  • twine/ribbon
  • eight 12 X 12 sheets of solid or coordinating double-sided scrapbook paper
  • 1 sheet for the stem
Instructions: 
View my uploaded Archiver's instruction sheet here and my tutorial movie below. 


Burlap Wreaths
Hallowee "Boo" wreath

I made the "Boo" wreath by spray painting 1 yard of burlap fabric black and cutting it into strips. I used pipe insulation to make a wreath and spray painted it black too.   Double tied the strips of burlap randomly around the wreath.  Modpodged scrapbook paper onto the chipboard letters and loosely tied them to the wreath with twine.  I hot glued the ends of the orange ribbon together to create a hanger. 
Fall Bubble Burlap Wreath
 I was inspired to make this burlap bubble wreath by this tutorial at Today's Fabulous Finds blog.  I again used pipe insulation to create the wreath but I wouldn't suggest it for this type of wreath.  Some of my stick pins aren't sticking into the foam very well, so I would spend the money on an actual foam wreath, if I were to make this again. 

And of course, a Grateful Banner
Grateful Banner

Here's the link to my banner/pennant tutorial to make your own.   

So from our home to yours-- Happy Fall ya'll :)  Now, enough crafting....I need to get back to cookbook typing, formatting and publishing! 

Thursday, October 27, 2011

Baby Shower Details

Sorry for the extended delay in posting the rest of Emry's shower details.  I forgot to take my camera for the big weekend in Midland *gasp*, so I have been counting on my twin sister to get me her pictures.  And my blog isn't high on her priority list :)  ha ha :)  But, I finally got them and so rather than posting several entries...I am going to give you the itty bitty details all at once because I have so many other blog entries I want to share too :) 

"Tweet Tree"

I created a "tree" by sticking several branches into a bucket of sand.  Then decorated it with little pieces of ribbon and these little birds. This tree greeted the guests at the front door with a sign that said "So Tweet of You To Come!"  This helped pull in the "brown/natural" part of the shower. 

Inspired by Pinterest, I made the birds by using this template and I cut them out of an old book.  (I free-handed my own wings).  I distressed them with some brown ink.  And I "jazzed" them up a bit with glitter by spraying adhesive glue on them and then lightly sprinkling them with glitter.  I made their little feet with small twigs. 

I am going to re-purpose them by using them as cute little gift tags for Christmas gift giving.  They would also make adorable ornaments :)  And I just stuck a couple of them on a wedding gift! 


(The shower pics of the birds and "tweet" tree didn't turn out so I took some different ones. )

Pom Pom Balls

Pom Pom Balls are all the rage in the craft blogging world and on Pinterest.  They are really simple and affordable to make but a bit time consuming.  All you need is tissue paper, floral wire, and fishing line.  (Note:  It is important to use double sided tissue paper). 

You basically fold, wrap with wrap and fluff!!  But visit this tutorial on Martha Stewart.com for a more detailed how to and step by step pictures, if you are really interested in making them. 
I love how big, bold and dramatic they look!

Memory Book Notecards


We used this idea to replace a traditional guest book. 


I cut white cardstock into 4 X6 sized notecards and embellished them with paper, stickers, stamps, etc... Then we put a double-sided table tent sign on each table explaining that we wanted each guest to use the notecard to write a note of congratulations, a memory of Tyler and Angel as they were growing up, advice, etc...

The guests did a fabulous job of writing all sorts of memories and advice.  Everyone enjoyed having us share a few of them aloud-- especially the ones with advice and written by the Grandmas.  We provided them with a special photobook to keep them in along with photos from her baby shower.  Tyler, Angel and Emry will cherish these the rest of her life.

 Table Centerpieces


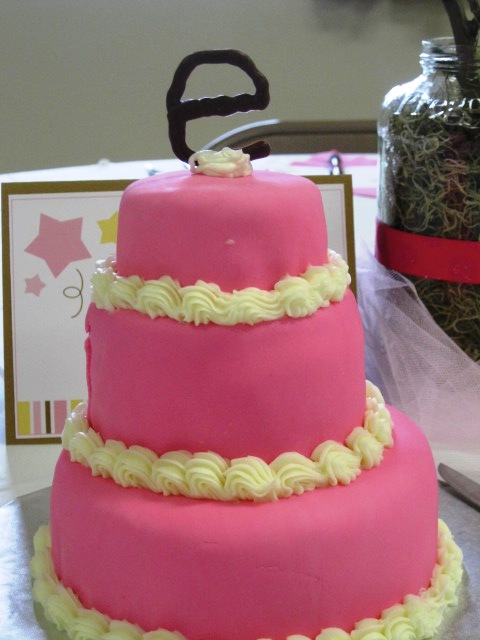
The table centerpieces consisted of these amazing cakes made by one of the hostesses and a glass jar filled with paper flowers. 

The three-tiered cakes with different flavors in each tier.  They were so pretty and so yummy! 

I made the paper flower arrangements by drawing a flower petal template, tracing/cutting 4-6 petals out of double sided scrapbook paper, randomly arranging them to look like a flower, gluing a button in the center, and adhering them with hot glue to a branch (stem).    I then stuffed upcycled jars with green moss and arranged 4-5 flower stems in each vase.  Tied a ribbon around the jar and viola-- flower centerpieces that were affordable, didn't wilt and can be used again! 

Menu & Recipes

It was a 2pm shower and we ate immediately after introductions and filling out the memory notecards. 

We served: 
  • Raspberry Sherbet Punch
  • Coffee (with a choice of creamers and whipped topping)
  • Ribbon Sandwiches
  • Fruit Delight Cups
  • Spinach Vegetable Dip
  • Italian Tortellini Kabobs
  • Cakes (on the tables and made by another shower hostess)
Ribbon Sandwiches Recipe
Ingredients: 
8 cups ground ham (Note:  I buy a "log" of ham and then grind it.)
2 hard boiled eggs
1-2 tablespoons onion
salt and pepper, to taste
3-4 cups salad dressing (Miracle Whip)
large container of Cheese Whiz
loaf of wheat bread
2 loaves of white bread

Directions: 
1.  Grind up ham, eggs, and onion using grinder attachment on Kitchen Aid mixer. 
2.  Mix ham mixture with salad dressing.  Salt and pepper to taste. 
3.  Spread ham mixture on one slice of white bread. 
4.  Spread cheese whiz on slice of wheat bread and place on top of white bread/ham layer. 
5.  Cover cheeze whiz with slice of white bread. 
6.  Using an electric knife trim off crusts, dividing it into 2 rectanuglar finger sandwiches. 


Italian Tortellini Kabobs
Ingredients: 
Frozen cheese tortellini
16 ounce block cheese of your choice (Monterey Jack, Cheddar, Colby, etc..)
cherry tomatoes
can of pitted olives
pepperoni slices
small bottole of italian dressing
kabob sticks

Directions: 
1.  Cook cheese tortellini according to package directions. 
2.  Place in medium bowl with pepperoni and pour Italian dressing over them.  Stir gently.  Place in refrigerator overnight or continue prepping. 
3.  Soak kabob sticks in water according to package directions. 
4.  Cut cheesse block into bite size pieces. 
5.  Wash cherry tomatoes and drain black olives. 
6.  Arrange ingredients on kabob sticks. 
7.  Refrigerate until serving.