Last Fall I garnered enough interest to start a monthly craft club at my house. I plan the craft project(s) and then send my friends a supply list so everyone can put their own spin & touches on our creations. Then we gather once a month at my house to craft and create! It's so fun to feed off one another's energy and creativity, share supplies, and just generally catch up on one another's lives.
 |
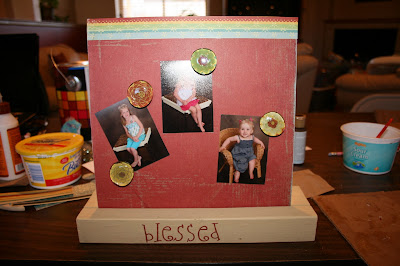
| This is what my memo/picture board looks like! |
Today we made a memo/picture frame out of sheet metal and some 2 X4's and magnets out of flat bottomed glass gems. I had seen several examples of this craft but struggled to find clear directions on how to make it, so I'll share our tips & techniques to help the rest of you if you want to create 1 or 2 of them yourself.
Supply List:
- Sheet Metal (a 24 X 36 piece was $9.52 in the plumbing department at Lowe's)
- 2 X 4 (cut to your desired length--we made ours a couple of inches wider than our sheet metal pieces)
- Large flat bottomed glass beads (a bag of about 30 cost $1 at the Dollar Tree-- the kind for filling vases with)
- Scrapbook paper
- tin snips
- paint
- paint brush
- magnets
- Mod Podge
- brayer
- 9001 glue
- 1 1/4 circle punch
- scissors
- sand paper and file
- embellishments (ribbon, stickers, etc...)
Directions:
- Cut 2 X 4 according to desired length. We made ours 1 foot long.
- Using a table saw, cut a 1/2" deep groove about 1" from the front edge.
- Use tin snips to cut sheet metal according to desired length. We made ours 10 X 10.
- Sand edges of the 2 X 4 with sandpaper and sand the edges of the sheet metal with a file.
- Paint 2 X 4.
- Cover and/or embellish sheet metal piece with scrapbook paper. We mod podged our paper onto the metal by applying mod podge to our sheets of paper and then adhering it to the metal. Lay it down carefully because it adheres quickly with little or no wiggle room.
- Use a brayer to roll out any bubbles in your paper.
- Using a circle punch, punch out your desired magnet designs out of scrapbook paper.
- Apply a thin layer of mod podge to flat bottom of glass bead and to scrapbook paper.
- Afix the bead and paper together and let it dry.
- Using scissors trim excess paper from sheet metal and glass beads.
- Apply 9001 glue to the back of your gem/paper and add your magnet. You only need to use a very small amount.
- Give the 9001 glue sufficient time to dry (about 5 minutes).
 |
| Steph's |
 |
| Natalie's |
 |
| Close-up view of my magnets |
If you don't want to create the magnetic board the magnets themselves would make a nice small gift for a teacher, hostess, secret sister, etc...


No comments:
Post a Comment