Monday, October 31, 2011

Fall Crafting and Decorating


I can't believe tomorrow is November 1st-- that marks the date we start listening to Christmas music in our home :) So, I better get my fall craft project ideas posted before time runs out for folks to make them and enjoy them through Thanksgiving.

2 X 4 Blocks
Using 2 X4 scraps, acrylic paint, scrapbook paper and mod podge I made these blocks to spell out Fall.

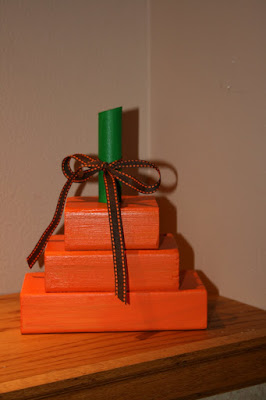
A "graduated" 2 X4 block pumpkin.

I used some more 2 X4 scraps, paint, and a wood dowel to make some pumpkins.


Paper Pumpkins

Rounded Paper Pumpkins
Archiver's Accoridan Paper Pumpkin Project

Rounded Paper Pumpkins

Supplies:
  • Double sided 12 X12 scrapbook paper
  • 2 brads per pumpkin
  • paper cutter 
  • paper puncher
  • ribbon or paper for stem
Instructions:
1.  Cut 12 one inch strips of 12 X12 paper with paper cutter to make a large pumpkin. 
2.  Punch a circle at the bottom and top of each strip of paper.
3.  Cut a piece of ribbon or paper to make a round stem.  
4.  Bind strips together by using a brad. Also adhere stem to pumpkin using a top brad.   
5.  Slide strips apart one by one to make a pumpkin shape. 

Archiver's Accordian Paper Pumpkin Project/Tutorial

When I recently visited an Archiver's store, I picked up an instruction sheet on how to make this pumpkin decoration.  It is adorable but it was a struggle to make with their directions.  So, I decided supplement their directions with a tutorial video.  This should make it much easier for you to create one if you'd like. 

Supplies: 
  • Martha Stewart scoring board and scoring utensil
  • paper cutter
  • hot glue and hot glue gun
  • 1- 1 1/2" paper punch (you will need 20 circles)
  • scissors
  • leaves
  • twine/ribbon
  • eight 12 X 12 sheets of solid or coordinating double-sided scrapbook paper
  • 1 sheet for the stem
Instructions: 
View my uploaded Archiver's instruction sheet here and my tutorial movie below. 


Burlap Wreaths
Hallowee "Boo" wreath

I made the "Boo" wreath by spray painting 1 yard of burlap fabric black and cutting it into strips. I used pipe insulation to make a wreath and spray painted it black too.   Double tied the strips of burlap randomly around the wreath.  Modpodged scrapbook paper onto the chipboard letters and loosely tied them to the wreath with twine.  I hot glued the ends of the orange ribbon together to create a hanger. 
Fall Bubble Burlap Wreath
 I was inspired to make this burlap bubble wreath by this tutorial at Today's Fabulous Finds blog.  I again used pipe insulation to create the wreath but I wouldn't suggest it for this type of wreath.  Some of my stick pins aren't sticking into the foam very well, so I would spend the money on an actual foam wreath, if I were to make this again. 

And of course, a Grateful Banner
Grateful Banner

Here's the link to my banner/pennant tutorial to make your own.   

So from our home to yours-- Happy Fall ya'll :)  Now, enough crafting....I need to get back to cookbook typing, formatting and publishing! 

Halloween Tic Tac Toe Board Costume

Happy Halloween!!! Hope you and your families have a good time trick or treating. 

Josiah is being a "party-pooper" this year and refused to participate in a family costume idea this year. I wanted us to all dress up as Angry Birds or Smurfs but he can be a "fun-hater" sometimes and said NO! He wanted to be a white power ranger but we either couldn't find a costume in his size or they were so ridiculously expensive that I refused to buy it for him.

Since we couldn't reach an agreement on costuming, Josiah said for days and weeks that he wasn't celebrating Halloween this year. As a Mom that loves to celebrate life and every big and little holiday, this made me so sad. Plus, I didn't want him to regret not having a costume when his class party began or dusk rolled this evening and I was stuck scrambling for an idea.

After conversing and negoitating, we settled on him being an interactive tic tac toe board. I wanted to make the tic tac toe board larger and have a board on his front and back-side but our little "ghoul" said he would only wear it if it was small and only on the front of his body. So, I adapted my plans and this is what I came up with late last night.

Tic Tac Toe Board Halloween Costume

Materials: 
pizza box or cardboard box
felt
scissors
hot glue gun (It does not show through felt). 

Make neck strap by tucking felt through pizza box. 

Cover cardboard with felt; slitting felt to make nice corners. 

This is a look at the covered box and the grid lines. 
Cut X & O's out of felt to make the board interactive!
I didn't finish it before he went to bed, so I held my breath all night wondering if it would meet his approval. It did!!!! He proudily took it to school with him so I hope that it will be a "hit" and not backfire, making him feel miserable and sad that I didn't let him be a white power ranger.

 In case anyone else in blog land is searching for an inexpensive last minute idea-- I decided to post our costume idea for inspiration.

We would love to know if we provided inspiration, so leave me a comment if you plan to use or adapt our costume idea.

Linking to:

Thursday, October 27, 2011

Baby Shower Details

Sorry for the extended delay in posting the rest of Emry's shower details.  I forgot to take my camera for the big weekend in Midland *gasp*, so I have been counting on my twin sister to get me her pictures.  And my blog isn't high on her priority list :)  ha ha :)  But, I finally got them and so rather than posting several entries...I am going to give you the itty bitty details all at once because I have so many other blog entries I want to share too :) 

"Tweet Tree"

I created a "tree" by sticking several branches into a bucket of sand.  Then decorated it with little pieces of ribbon and these little birds. This tree greeted the guests at the front door with a sign that said "So Tweet of You To Come!"  This helped pull in the "brown/natural" part of the shower. 

Inspired by Pinterest, I made the birds by using this template and I cut them out of an old book.  (I free-handed my own wings).  I distressed them with some brown ink.  And I "jazzed" them up a bit with glitter by spraying adhesive glue on them and then lightly sprinkling them with glitter.  I made their little feet with small twigs. 

I am going to re-purpose them by using them as cute little gift tags for Christmas gift giving.  They would also make adorable ornaments :)  And I just stuck a couple of them on a wedding gift! 


(The shower pics of the birds and "tweet" tree didn't turn out so I took some different ones. )

Pom Pom Balls

Pom Pom Balls are all the rage in the craft blogging world and on Pinterest.  They are really simple and affordable to make but a bit time consuming.  All you need is tissue paper, floral wire, and fishing line.  (Note:  It is important to use double sided tissue paper). 

You basically fold, wrap with wrap and fluff!!  But visit this tutorial on Martha Stewart.com for a more detailed how to and step by step pictures, if you are really interested in making them. 
I love how big, bold and dramatic they look!

Memory Book Notecards


We used this idea to replace a traditional guest book. 


I cut white cardstock into 4 X6 sized notecards and embellished them with paper, stickers, stamps, etc... Then we put a double-sided table tent sign on each table explaining that we wanted each guest to use the notecard to write a note of congratulations, a memory of Tyler and Angel as they were growing up, advice, etc...

The guests did a fabulous job of writing all sorts of memories and advice.  Everyone enjoyed having us share a few of them aloud-- especially the ones with advice and written by the Grandmas.  We provided them with a special photobook to keep them in along with photos from her baby shower.  Tyler, Angel and Emry will cherish these the rest of her life.

 Table Centerpieces


The table centerpieces consisted of these amazing cakes made by one of the hostesses and a glass jar filled with paper flowers. 

The three-tiered cakes with different flavors in each tier.  They were so pretty and so yummy! 

I made the paper flower arrangements by drawing a flower petal template, tracing/cutting 4-6 petals out of double sided scrapbook paper, randomly arranging them to look like a flower, gluing a button in the center, and adhering them with hot glue to a branch (stem).    I then stuffed upcycled jars with green moss and arranged 4-5 flower stems in each vase.  Tied a ribbon around the jar and viola-- flower centerpieces that were affordable, didn't wilt and can be used again! 

Menu & Recipes

It was a 2pm shower and we ate immediately after introductions and filling out the memory notecards. 

We served: 
  • Raspberry Sherbet Punch
  • Coffee (with a choice of creamers and whipped topping)
  • Ribbon Sandwiches
  • Fruit Delight Cups
  • Spinach Vegetable Dip
  • Italian Tortellini Kabobs
  • Cakes (on the tables and made by another shower hostess)
Ribbon Sandwiches Recipe
Ingredients: 
8 cups ground ham (Note:  I buy a "log" of ham and then grind it.)
2 hard boiled eggs
1-2 tablespoons onion
salt and pepper, to taste
3-4 cups salad dressing (Miracle Whip)
large container of Cheese Whiz
loaf of wheat bread
2 loaves of white bread

Directions: 
1.  Grind up ham, eggs, and onion using grinder attachment on Kitchen Aid mixer. 
2.  Mix ham mixture with salad dressing.  Salt and pepper to taste. 
3.  Spread ham mixture on one slice of white bread. 
4.  Spread cheese whiz on slice of wheat bread and place on top of white bread/ham layer. 
5.  Cover cheeze whiz with slice of white bread. 
6.  Using an electric knife trim off crusts, dividing it into 2 rectanuglar finger sandwiches. 


Italian Tortellini Kabobs
Ingredients: 
Frozen cheese tortellini
16 ounce block cheese of your choice (Monterey Jack, Cheddar, Colby, etc..)
cherry tomatoes
can of pitted olives
pepperoni slices
small bottole of italian dressing
kabob sticks

Directions: 
1.  Cook cheese tortellini according to package directions. 
2.  Place in medium bowl with pepperoni and pour Italian dressing over them.  Stir gently.  Place in refrigerator overnight or continue prepping. 
3.  Soak kabob sticks in water according to package directions. 
4.  Cut cheesse block into bite size pieces. 
5.  Wash cherry tomatoes and drain black olives. 
6.  Arrange ingredients on kabob sticks. 
7.  Refrigerate until serving. 


Monday, October 17, 2011

"e" Button Monogram Tutorial


Last weekend was definitely one of the highlights of the year for me....not only did I get to plan Mom and Dad's retirement celebration/ribbon cutting but also a baby shower!  Two parties in one weekend--- ah, BLISS!!! 

So without further adieu let's move onto part two of our busy weekend (last weekend)....a baby shower honoring Emry.   She is the daughter of my nephew and his wife-- yep, that makes me a GREAT aunt!  (Note:  I wasn't the only hostess of the special party but the rest of them gave me free reign to run with my ideas).  I've listed a few highlights that I will be spotlighting on my blog over the next week or two: 
  • "e" Button Monogram Art
  • "tweet" tree
  • tissue paper pom poms and memory notecards
  • E-M-R-Y chipboard letters and paper flower centerpiece arrangements
  • Shower food recipe
Today I am focusing on the "e" I made as a gift for Emry but also doubled as a shower decoration.  It is called Button Monogram Art.  It really is super easy to make and my "e" took me just under 2 hours to complete.  (Suggestion-- Perfect opporunity to catch up on DVR recordings or watch a movie!) 


Materials List
  • art canvas
  • paint (if you want to paint canvas before adhering buttons)
  • printer
  • heavy cardstock (to print monogram on to transfer to canvas)
  • buttons and gemstone embellishments (if you want a lil' bling!)
  • pencil, eraser, and scissors
  • E-6000 glue (easier and handier to use than hot glue but holds just as well)
  • display tools (Options:  easel or picture hanger)
Button Art Instructions
  • Type your monogram letter in Publisher (a Microsoft program).   

  • Pick a fun font for your monogram letter. 

  • Adjust your text box in Publisher to "auto-fit" and then enlarge text box until your monogram letter is the size you wish.  This is an important step to make the monogram letter large enough to work with.  Just selecting a large font in Word will not make it big enough to fill a canvas. 

  • Print out mongram letter on heavy cardstock and trim with scissors.

  • Trace letter onto canvas.

  • Select buttons and use E-6000 glue to glue on buttons.  I glued down several of my bigger buttons then filled in with smaller ones.  Also, I did overlap some of my buttons/embellishments, too. 

  • After you are done, use eraser to get rid of any pencil lines that are still visible. 

The "e" is traced and I am ready to adhere buttons. 

Finished Product
Let me know if you give it a try!  It really is simple to do, even for those who aren't typically so crafty :)

Friday, October 14, 2011

RETIRED!!!

Ernie, Laurel, Angel & Tyler

After 52 years, my parents have fnally RETIRED!!!! They opened a hardware store, lumberyard and construction business just four months after they were married and have owned it ever since. 

Our family is thrilled that all the businesses are staying within the family! Dad and Mom handed over the regins to the businesses to my brother and his son.  Randy/Holly own and operate the construction business and Tyler/Angel just bought and run Ernie's Building Center as of June 1, 2011. 

All of us kids are so pleased that they are finally retired!  They deserve it!  They have tirelessly worked over the years to build quite a legacy.  They worked so very hard and so, so, so many long hours. 

To honor Dad and Mom, their hard work, and this momentous occassion, we threw a retirement celebration in conjunction with Ernie's Building Center's Annual Customer Appreciation Day. 

Since May, I have been planning, organizing and dreaming what the celebration would look like.  Mom and Dad wanted it very unobtrusive because they don't like to be in the spotlight.  With that in mind, I searched and searched for retirement celebration ideas but I always came up empty-handed.  So, I put my creative thinking cap on and here's what I came up....

Rick, Terry, Laurel, Ernie, Tyler, Angel, Randy, Barb, & Becky


It's official (all the above, plus Roy next to Angel)


First, we held a private ribbon cutting to honor Tyler and Angel's new endeavor.  My brother, Terry, was the emcee of the event and did a FANTASTIC job.  We took lots of pictures with family and vendors; then, we watched a movie that Rob, Barby, and I put together recalling Dad and Mom's contributions and legacy.  I used "Picasa" to create the video but to upload it I had to split it into 2 parts because it takes time to recall over a half of a century of memories!

Part 1 of Video

Click on this link to view Part 2 of the Video:

I also gathered, organized and presented our family's memories of the businesses on "posters" for folks to read at their leisure.  I dubbed it a "Trip Down Memory Lane"...and mounted the posters on lathe sticks and stuck them in sand-filled buckets.  We opted for that presentation so they could easily be moved around and would be at eye level for most of the guests.  We neglected to take pictures of each poster but you can see them in the background of the below photos. 

Watching memory presentation.  (Note:  Posters in the backgrounds of both pictures.) 


We also invited customers, friends, neighbors, etc...to recount and share their personal memories with Mom and Dad.  I embellished notecards and strung them from a clothesline with decorated clothespins.  We were pleased so many shared their thoughts and memories. 


So, for those of you who couldn't attend....I hope you enjoyed the re-createment of the event and for those of you seeking inspiration I hope my ideas will help you create a memorable retirement celebration for the special retiree(s) in your life! 

The Nemec Clan
I wish Mom and Dad many happy years of retirement in their big diesel pusher :)  You most certainly have earned it and definitely deserve it!!


Thanks to all of the family's help for making this event so special and letting me "run" with my ideas :)  Everyone pitched in to make it all a reality!  Holly- providing pictures, Barby-editting, Randy- pounding nails to make a "52", Katey's help with the banners, Rick/Sue's help with set up and tear down, Terry- emceeing the ribbon cutting, Jackie- for taking pictures and last but not least, Rob, for always lending his support and hands to make my "big ideas" a reality.  It was truly a family effort :)